English
 Deutsch
 Español
 Français
 Italiano
 日本語
日本語 Русский
 中文
中文
Exploring the Fascinating World of Infill Patterns in 3D Printing
- Published November 06 2025 - Updated August 25 2026
How to Optimize Parts for Strength, Weight, and Material Efficiency Using Internal Geometry.
In our previous article, we mentioned how 3D printing technology transforms digital designs into physical products in precise details. While the outer most shell of the product is created by the outline of the 3D design, the space inside the product is created with a lattice-like structure known as infill. In this article, we will take a closer look into the definition of infill, the reasons why one needs to choose the right amount of infill and the various types of infill patterns.
1. WHAT IS INFILL IN 3D PRINTING?
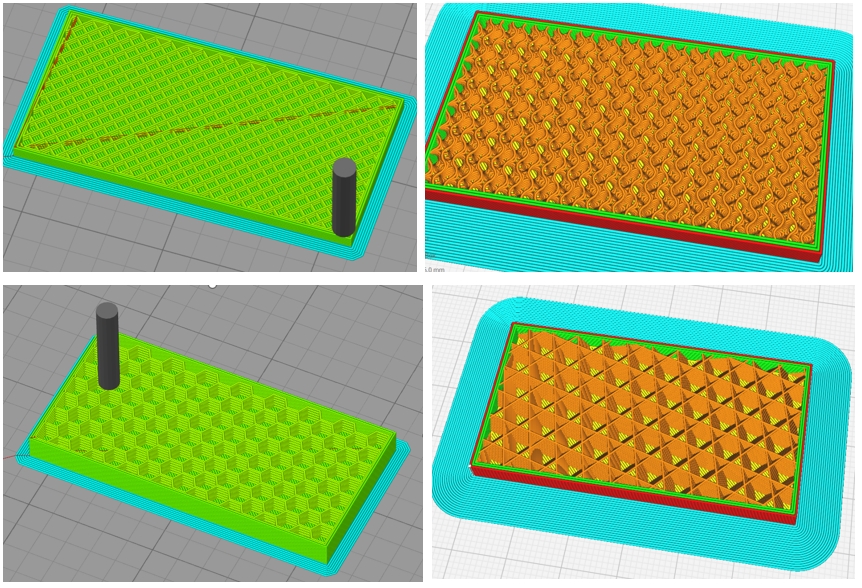
‘Infill’ is a term that you will commonly hear in the 3D printing community. Essentially, it is the internal structure that forms the inside of a printed object. This would be the area between the outside surface of the part and the inside volume of the solid part would have if it were 100% infill. This inside structure is created by a pattern of lines and surfaces that are printed on layer by layer on the inside of the object. These lines and surfaces can be created with a variety of patterns to form the internal structure. This internal structure is what we refer to as the ‘infill’ of a 3D printed part.
Infill can be adjusted in two main ways, by increasing or decreasing the amount of fill, and by changing the pattern that the fill follows. Both of these aspects can have significant effects on a printed part. The weight of the part, the strength of the part, and material efficiency of the part are all greatly affected by the amount of infill and the pattern used to create the inside of the object. In addition to these factors, the time it takes to print a 3D part can also be greatly affected by the amount of infill and the pattern used. With so many different variables involved in the inside of a 3D printed part, it is very easy to try to find the perfect balance for a specific application.
2. WHY DOES INFILL MATTER?
In addition to optimizing the strength of a part with an open or hollow structure by increasing the density of the internal fill, the fill structure itself can be designed to be stronger for functional parts printed with stressed materials. This can be done by printing the part with a 100% infill. On the other hand, printed parts can also be designed to be lighter in order to reduce weight for applications in the aerospace industry or the automotive sector. This is achieved by reducing the fill density, for example to 20% with a hollow space in between.
On the other hand, parts with a low infill density are lighter than their solid counterparts. This makes them perfect for industries like Aerospace and Automotive where every gram of extra weight can have serious consequences.
Parts that use internal structures and their corresponding infill patterns can be printed using less material and still maintain strength, thus making printed parts more cost-effective. In addition, they are also more environmentally friendly.
There are times when a part is internally structured to maximize strength while also being as light as possible for weight-critical applications, and yet another critical factor in the printed part is the amount of material that is used to 3D print it. In these cases it is very important to try to find a good balance between all of the factor mentioned above in order to print parts that will be strong enough for intended use, made of just right amount of material to remain cost-effective and environmentally friendly, and to print in a reasonable amount of time.
3. COMMON TYPES OF INFILL PATTERNS
3.1 Rectilinear
This is the most basic type of infill. It is a structure of interconnecting straight lines. It is the most efficient infill for providing strength to a part, however, it does not work well for very complex part geometries. Nor will it be able to handle parts that have to withstand a lot of stress or flexing.
Note that the terms “Rectangular Lattice” or “Rectangular” are used for this type of infill in many slicing software packages. For example in Cura this type of infill is commonly referred to as “Zig Zag”, while in Simplify3D, Prusa Slicer and Bambu Studio this type of infill is referred to as “Zig Zag – Rectangular Lattice” or in short “Zig Zag”.
3.2 Honeycomb
The honeycomb structure has a high surface area. For this reason it is perfect for making very light yet very strong parts and objects. The honeycomb structure is a natural structure. Beehives are build up with honeycombs. The honeycomb structure is very strong because of the way the honeycombs are connected to each other. The loads are distributed very evenly throughout the structure. This is the reason why honeycomb patterns are perfect for functional 3D printed parts and objects.
Note: The Honeycomb pattern is not supported by Cura. However this pattern is also supported by Simplify3D, Prusa Slicer and Bambu Studio.
3.3 Gyroid
Gyroid infill creates a 3D maze like structure that is strongest in multiple directions. So ideal for the functional components that require a combination of strength and flexibility.
Please remember that this type of infill pattern is supported in Cura, Prusa Slicer, Bambu Studio but not in Simplify3D.
3.4 Triangular
Filled with Triangular spaces, this infill provides good strength in compression as well as stability. Very common as an infill for functional parts.
Note: The Triangular infill pattern is supported by all slicer versions Cura, Prusa Slicer, Bambu Studio and Simplify3D.
3.5 Cubic
This additive manufacturing infill pattern consists of a simple 3D space filled up with a number of cubes that are evenly spaced and pierced with the infill material. Therefore the Cubic infill pattern provides a uniform amount of strength in all directions.
Note: This pattern is not supported by Simplify3D.
3.6 Concentric
Concentric patterns, as the name suggests, are made of concentric shapes. These shapes can be circles or even squares for example. Concentric patterns are best used for creating parts that are strong and have good support of the perimeter of the part.
Note: Concentric pattern is not supported by Simplify3D.
Slicer Software for 3D Printing – How to choose the right one? Read More.
4. CHOOSING THE RIGHT INFILL PATTERN
For decorative objects printed with additive manufacturing which are only lightly filled, it is advisable to keep the density of the filling as low as possible in order to save materials and print time. In order to make components stiff and strong for bearing loads, filling patterns such as Honeycomb, Gyroid or Cubic are best. For flexible parts, Gyroid or Honeycomb patterns are most suitable. For saving print time and minimizing material, simple patterns with low filling density are best. Rectangular or Triangular patterns are suitable for this purpose.
CONCLUSION
Print infill is an important feature when additive printing. Print infill has a significant influence on several important features of a 3D printed part, such as strength, weight, material usage and printing time. For this reason, it is important to know the basic types of infill and their typical areas of application. Most 3D printed parts are lightweight and must also be strong enough for practical use. Other parts are printed as prototypes. These parts are also typically lightweight and must be flexible to a certain degree in order to be suitable for testing / trials.
For such parts honeycomb and gyroid structures are typical. Parts that must be strong and stiff are typically printed with honeycomb or cubic infill structures. Lightweight parts that are only used for display purposes are printed with low density infill structures such as rectilinear or concentration structures. These types of print infill save material and time during the additive manufacturing 3d printing process.